DirectAdmin master/slave replication
In order to configure Direct Admin for master slave replication for use with the Realtime Register Premium DNS-servives, follow the instruction below.
| Setup master/slave replication for all zones on your Direct Admin nameserver
|
Setup master/slave replication for individual zones on your Direct Admin nameserver
|
Setup master/slave replication for all zones on your Direct Admin nameserver
- 2
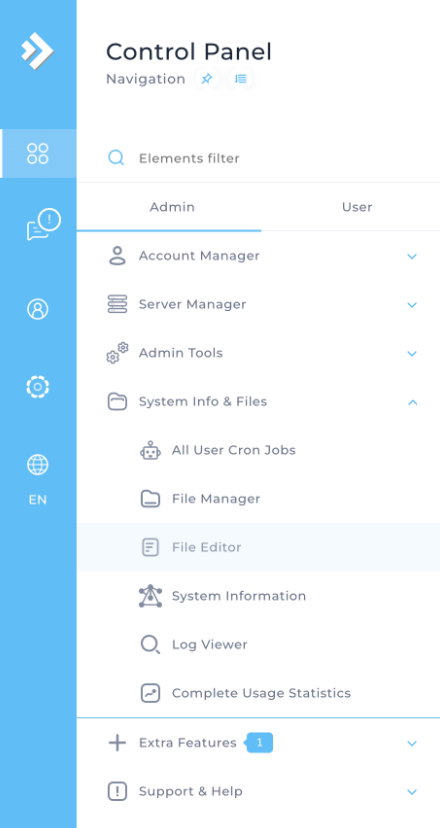
- Select “/etc/bind/named.conf”
- 3
-
Add the following snippet and save the changes
options {
     allow-transfer {
            83.136.34.50;
            2a02:850:8::50;
      };
      also-notify {
            83.136.34.50;
            2a02:850:8::50;
     };
};

- 4
- Navigate to “Control Panel” → “Admin” → “Admin Tools” → “Service monitor”

- 5
- Reload the service “named”

- 6
- Navigate to “Control Panel” → “Admin” → “Server Manager” → “Administrator Settings”

- 7
-
Under “Server Settings” update the NS1 / NS2 fields to “ns1.premiumdns.zone.” and “ns2.premiumdns.zone.” or your own pre configured vanity name servers.

- 8
- This takes care of automatic replication of the content of all zones and the default name servers for newly create zones, before a zone can be replicated it needs to be provisioned in our platform with the IP address of your server as master. To create (and delete) zones you have multiple options:
- Create and delete the zones manually trough our portal
- Automate the creation and deletion the zones in your backoffice software using our API
- Automatically create all zones know on this server and delete zones when removed from the server, see setup instructions for this below
Automatic zone creation & deletion
You can opt for automatic zone creation & deletion if you like using Direct Admin and the Realtime Registrer Premium DNS services.
If you want to automatically create and delete zones for all domains added to or removed from DirectAdmin setup the following hooks on your server. For this you need a Realtime Register API key with at least the VIEW_DNS_ZONE, CREATE_DNS_ZONE and DELETE_DNS_ZONE permissions.

The scripts are a basic implementation, you can extend them with any requirements and error handling you require for your specific needs and setup.
As a safety measure the default deletion script will only remove a zone if the master matches the server.
cd /usr/local/directadmin/scripts/custom/
wget https://raw.githubusercontent.com/realtimeregister/example-scripts/raw/directadmin-dns-zones/dns_create_post.sh
wget https://raw.githubusercontent.com/realtimeregister/example-scripts/raw/directadmin-dns-zones/dns_delete_post.sh
chmod 700 dns_create_post.sh
chmod 700 dns_delete_post.sh
chown diradmin:diradmin dns_create_post.sh
chown diradmin:diradmin dns_delete_post.sh
Configure your API key and server IP address in both scripts.
Setup master/slave replication for individual zones on your Direct Admin nameserver
| Update an existing zone in Direct Admin for master slave replication
|
Create a new zone in Directadmin for maste slave replication
|
Update an existing zone in Direct Admin for master slave replication
- 1
-
navigate to “Control Panel” → “User” → “Account Manager” → “DNS Management”

- 2
-
Change the name servers in the zone to “ns1.premiumdns.zone.” and “ns2.premiumdns.zone.” or your own pre configured vanity name servers. !Important; note the dot (.) and the end of the hostname

- 3
-
Navigate to “Control Panel” → “Admin” → “System Info & Files” → “File editor”

- 4
-
Select “/etc/bind/named.conf” and add the following snippet to the desired zone(s) and save the changes
  notify yes;
  allow-transfer {
    83.136.34.50;
    2a02:850:8::50;
  };

- 5
-
Navigate to “Control Panel” → “Admin” → “Admin Tools” → “Service monitor”

- 6
-
Reload the service “named”
- 7
-
Create the zone in our platform with the IP address of your server as master.

- 8
-
If the configuration is correct the records should become visible on the zone after the initial transfer automatically, you can use the “Retrieve zone” action to force a update.
Create a new zone in Direct Admin for master slave replication
- 1
-
Navigate to “Control Panel” → “Admin” → “Server Manager” → “DNS Administrator”

- 2
-
Select “+ Add DNS Zone”

- 3
-
Create the zone wit your IP address and the “ns1.premiumdns.zone” and “ns2.premiumdns.zone” name servers, or your own pre configured vanity name servers. !Important; in this case the dot (.) and the end of the hostname is not supplied

- 4
-
Navigate to “Control Panel” → “Admin” → “System Info & Files” → “File editor”
- 5
-
Select “/etc/bind/named.conf” and add the following snippet to the desired zone(s) and save the changes
  notify yes;
  allow-transfer {
    83.136.34.50;
    2a02:850:8::50;
  };
- 6
-
Navigate to “Control Panel” → “Admin” → “Admin Tools” → “Service monitor”
- 7
-
Reload the service “named”
- 8
-
Create the zone in our platform with the IP address of your server as master.
- 9
-
If the configuration is correct the records should become visible on the zone after the initial transfer automatically, you can use the “Retrieve zone” action to force a update.